Assignment #4 - Influence Maps
GPR440 Advanced AI
[ 3.25.21 ]
| Made With | Languages |
|---|---|
| Unity3D Rider |
C# |
Overview
The goal of this project was to implement and utilize influence maps. In an effort to make every assignment build off of the last, I used the same grid and nodes I used for the flow fields, and used as much of the flocking behavior as possible. I ended up only keeping the separation component, the obstacle avoidance component and the flow pathing component for the agents.
While influence maps can be applied in different ways, I talk mostly from the perspective of strategic AI in something like an RTS
Modifying the Grid
Expanding the Node Class
Since the way I am approaching influence maps is also node-based using a grid map, I just need to add tracking for influence. I am only using two teams, so for the basic influence I can just add influence from team 1 and subtract influence from team 2.
Then, I can also track total influence exterted on a node for calculating the other influence maps. To the right are lines added to the node class to support the new influence functionality.
// new variables
private float _netInfluence;
private float _totInfluence;

// getters/setters you want

// takes in positive or negative influence
public void AddInfluence(float inf)
{
    _netInfluence += inf;
    _totInfluence += Mathf.Abs(inf);
}
Expanding the Grid Class
// Resets lists to make a new influence map
private void StartInfluenceMapCalc()
{
    _inflInProgress = true;
}

// calculate the influence map
private void CalculateInfluenceMap() { ... }

// check recorded influence is correct in all nodes
void ValidateMap() { ... }

// start influence calculation when tower was made
public void ReportTowerMade(Tower t)
{
    // add tower to list to be processed
    _inflTowerList.Add(t);
    // if not already being calculated then start
    if (!_inflInProgress)
        StartInfluenceMapCalc();
}

// restart validation when tower was destroyed
public void ReportTowerDied(Vector3 pos)
{
    _lastNodeProcessed = 0;
}
To the actual grid you obviously have to add functions to actually calculate the influence map. When the grid is told a tower was created, it spirals out from that location adding the appropriate amount of influence based on distance. When the distance reaches the maximum given by the tower made, it stops adding nodes to the open list.
For deleting towers, I have the ValidateMap() function that slowly goes through the entire map and verifies each node has the correct amount of influence compared to all of the towers active in the scene. I did it this way so that I could add influence decay later.
Calculating Influence
When a tower is placed, I have a function that uses Dijkstra's algorithm to add influence to neighbor nodes based on world distance from the tower to the center of the node. To calculate influence based on distance, I use the equation:
I = -(B * d^2) / R^2 + B
where I is influence, B is base influence, d is the distance between the tower and the node, and R is the maximum distance the tower can extert its influence. I use this equation because it gives you a curve where you control what the influence is at a distance of 0 and know at what distance the influence will be 0--all without needing to use sqrt().
// get the map coord of the seed
Vector3 originWorldPos = currTower.transform.position;

// add max influence to node under tower
Node seed = _map[MapToIndex(WorldPosToMap(originWorldPos))];
seed.AddInfluence(currTower.Influence * (currTower.Team == 0 ? 1 : -1));

// add the node under the tower to the open list
_inflOpenList.Add(seed);

// go until no more neighbors
while (_inflOpenList.Count > 0)
{
    // get node to process from front of list
    Node curr = _inflOpenList[0];

    // move from open to closed
    _inflOpenList.RemoveAt(0);
    _inflClosedList.Add(curr);

    // get the connections
    List neighbors = new List();
    GetConnections(ref neighbors, WorldPosToMap(curr.Position));

    // add all neighbors that have influence to open list
    foreach (Node neighbor in neighbors)
    {
        // first check if in lists already
        if (InList(ref _inflOpenList,   neighbor) == -1 &&
            InList(ref _inflClosedList, neighbor) == -1)
        {
            // get world position of neighbor
            Vector3 nWorldPos = neighbor.Position;

            // calculate influence: I = -BD^2/Dm^2+B
            float inf = -(currTower.Influence *
                         (originWorldPos - nWorldPos).sqrMagnitude) /
                         (currTower.maxDist * currTower.maxDist) +
                          currTower.Influence;

            // only add to open if influence > 0
            if (inf > 0)
            {
                // add to the open list
                _inflOpenList.Add(neighbor);

                // make the influence negative in on team 1
                if (currTower.Team == 1) inf *= -1;

                // add influence to the node
                neighbor.AddInfluence(inf);
            }
        }
    }
}
Validation Function
The validation function runs every frame, processing a small amount of nodes each frame in order. The function estimates the correct amount of influence that should be exerted on a node, and checks to see if that node currently has that amount. If it does not: it sets a new influence value.
For deleting towers, I was going to just do the reverse of the function above and subtract the influence that was being exerted by the tower. However, I decided that could potentially leave artifacts of remaining influence at the edges of the tower.
In addition, having a validation function like this would allow for handling a decay of influence. Right now the change is virtually instant (depending on the number of nodes processed compared to total nodes to process) but instead of replacing the incorrect value, I could lerp it towards the correct one to create a smoother effect.
The Different Maps
Below are descriptions of the different kinds of influence maps you can use to help make decisions.
Influence Map
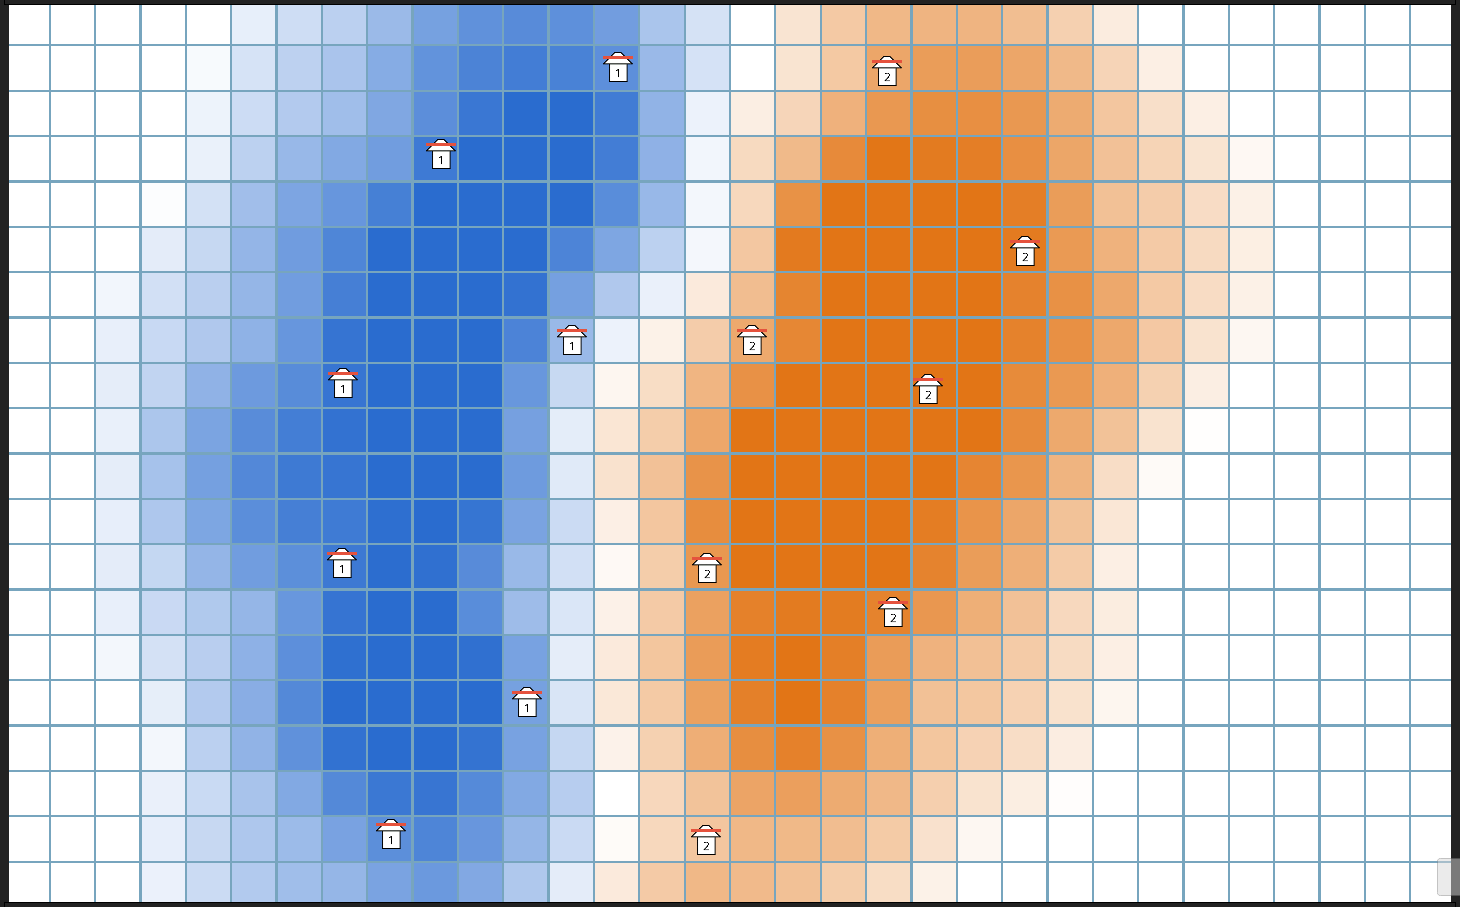
This is the influence map. It essentially shows the 'degree of control' over a particular location. The stronger the color indicates higher the influence that team has on the node.
As I stated above, I just add/subtract influence based on the team exerting it, which means I don't need to track team. If you want to use more than 2 teams, you would have to track which team has control, and potentially need to track each individual piece of influence.
From there, you could either use a weighted approach for degree of control (i.e. Team 2 would have 40% control of a node if their influence makes up 40% of the total influence exerted on that node) or map flooding, where you just use the highest influence extered by any source as the influence of that node.
This map can be used to inform strategic decisions by allowing you to choose safer routes that you have control over and avoid areas where the enemy has a high degree of control.
Tension Map
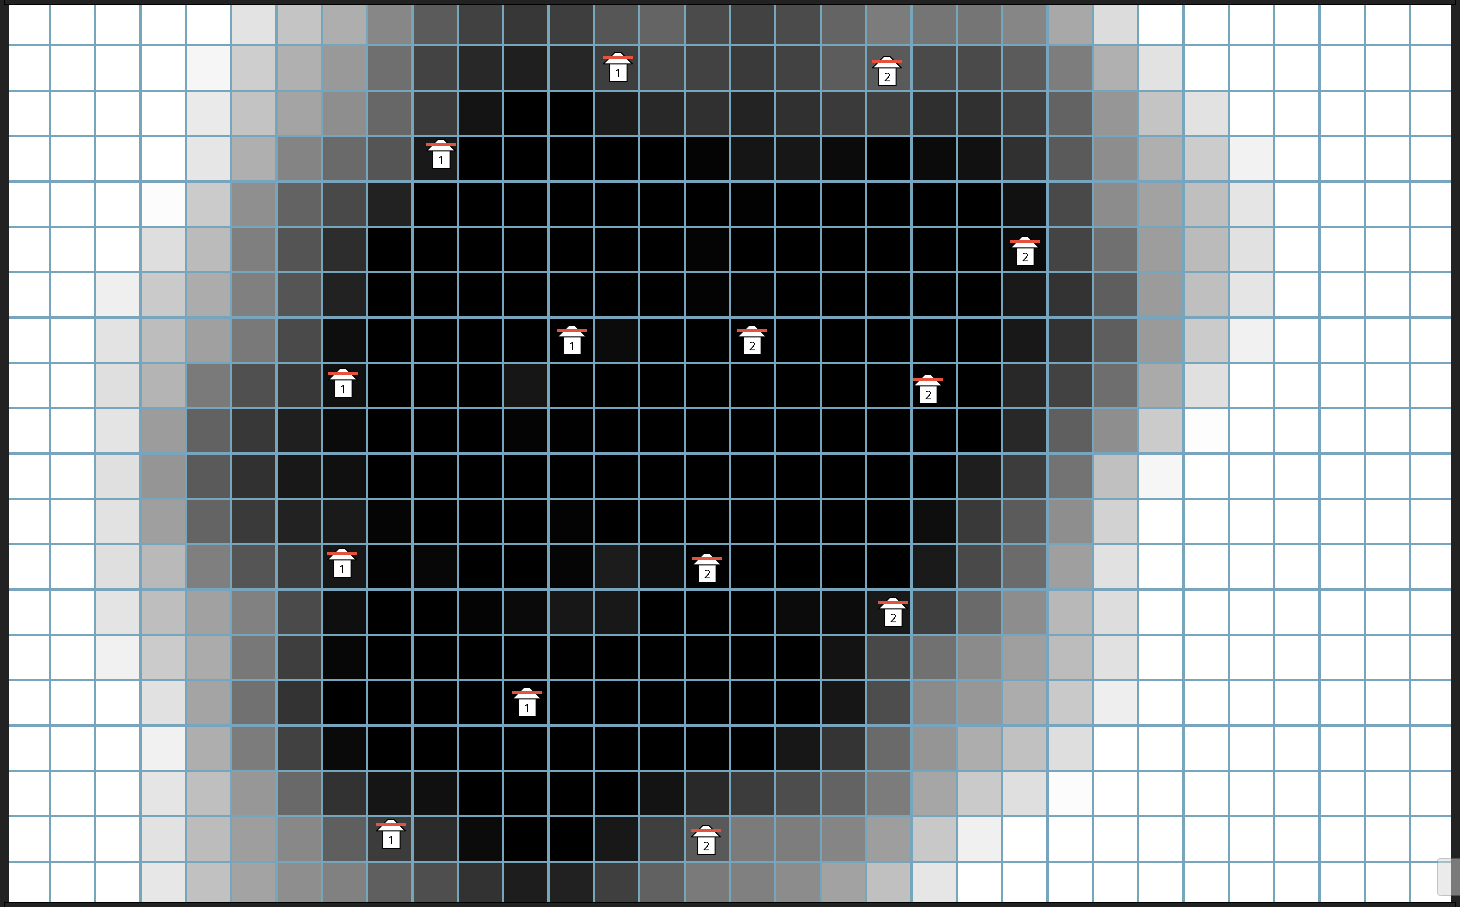
The tension map shows is the concentration of influence. The stronger the color indicates a high total influence being exerted on the node.
For this, I just add all influences together (and not subtract for one team). This then obviously does not require any special approach if you are using more than one team.
This map can be used (assuming this is an rts) as a way to indicate where you should place units, because an area with high tension either indicates a battle zome or a home base, either of which you would want a higher concentration of units. Since influence maps could also be used for resource propagation, tention could also be used to tell you where multiple resources are located.
As a side note: in my opinion, "Tension Map" is a bit of a misnomer, because it sounds like it would show where tension is; however, it really only shows you where large amounts of influence are and not who it is from.
Vulnerability Map
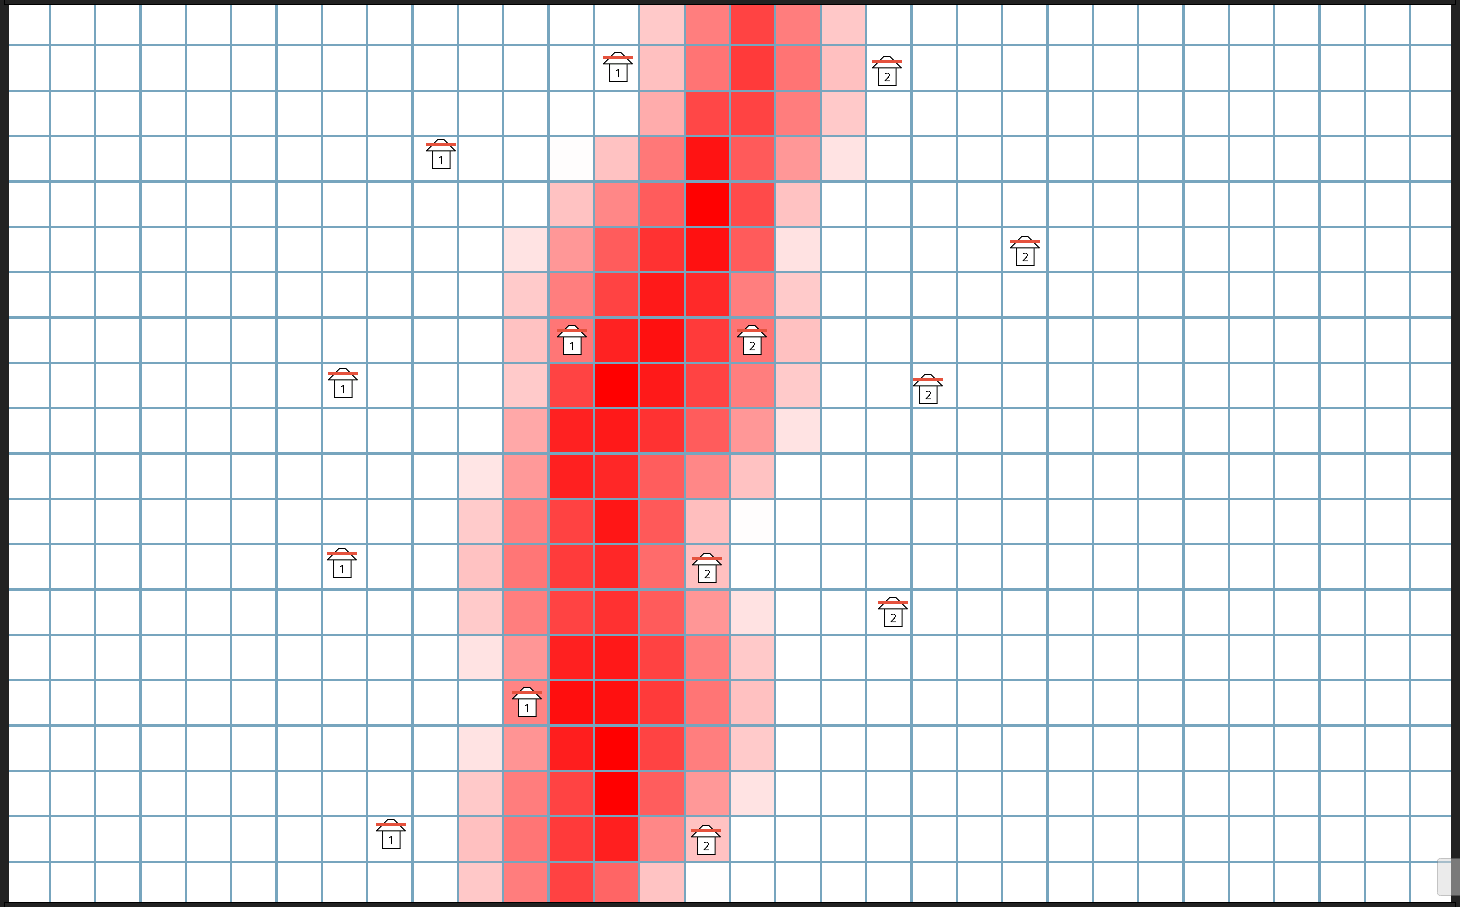
The vulnerability map tells you which areas are contested. A stronger color indicates a higher 'vulnerability,' or where there is a stronger oppositional force.
A node's vulnerability is calculated using V = T - abs(I), where T and I are a node's tension and influence values respectively. This results in a value that is greater than 0 only if there are two influences present. If there is only one influence present, T = abs(I) which means T - abs(I) = 0.
This map is very useful for visualizing front lines and, more generally, where fighting may be happening. From this, you know where to send reinforcements and/or an attack force.
For handling more teams, you may need a different approach since you will not have the same kind of I value, and you have to consider whether a team 'has stake' in a particular node. What I mean by this, is that since vulnerability--unlike the other maps--is the only map that is specifically relating to one team. If Team 1 isn't close enough to a particular location, then it likely won't care that Team 2 and 3 both have stake in it because it doesn't pose a threat to them.
However, if you could still use a similar vulnerability equation as a log of where fighting is, so you could attack locations where fighting is not, since you could likely assume the opposing teams would have their units closer to areas that are contested.
Tower Defense 'Game'
To try to use the influence maps, I made a very rough approximation of an RTS. You place down towers, press space to start (the GameManager counts total towers for each team) and then you spawn units that will then attack towers they come near. The game ends when one team's towers have been destroyed, and a score is calculated using:
Score = 10 * Te - Uf
Where your score is equal to the number of enemy towers killed minus number of friendly units killed.
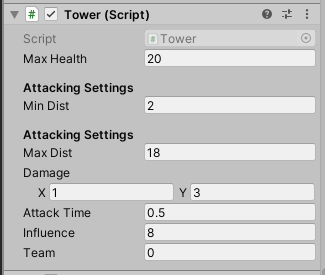
Towers
The tower script is fairly straightforward: it holds the base influence, its view distance and attack values. It casts an overlap circle looking for units, then filters through the ones it found looking for a unit that is on the opposing team.
When it finds an enemy unit, every defined amount of time (assuming it hasn't gone past its minimum attack range) it hits the unit with a random amount of damage in the range provided in the 2D vector damage.
Units
The unit has a bit more to it because there is a steering aspect. It also casts an overlap circle that is instead looking for towers, trying to find one on the opposing team.
For steering, the unit has an obstacle avoidance component and a separation component (like the one in flocking) for helping the agents look better, aas well as 2 pathing components: seek and flow field. It defaults to using the flow field for pathing, but when it detects and enemy tower it switches to the seek behavior.
Same as the tower, the unit will apply a random amount of damage in the range provided every set amount of time. The only difference is that the unit requires it to seek to the actual tower first before it can attack, and only has a closeness it needs (not an attack Goldilocks zone).
